
The ability to snap screenshots on a phone is one of the most often used features on the device. It may be to share a special moment on social media, to publish the highest score in a game, or even to transmit payment receipts. Today we will be looking into how to take screenshot in Samsung M31.
But before everything, let us see a little bit about the Samsung Galaxy M31.
About Samsung Galaxy M31

Samsung Galaxy M31
Samsung has announced the release of a new smartphone, the Samsung Galaxy M31. This smartphone will have an improved display, battery, and camera, as well as a more fashionable style.
As a result, let us begin by talking about the phone’s design. This phone boasts a 6.4-inch Full HD+ Dewdrop notch display design, and when it comes to performance, it has the newest Exynos 9611 Octa-core CPU from Exynos, which will make your gaming experience even better.
It also includes a fingerprint scanner. When it comes to the Samsung Galaxy M31’s camera, you will see that it has a Quad-camera arrangement on the back that comprises a 64-megapixel main lens with an f/1.8 aperture, an 8-megapixel (ultrawide) lens, a 5-megapixel (specialised macro lens), and a fifth 5-megapixel camera (depth sensor).
There is also a single 16-megapixel front-facing camera for snapping stunning selfies when necessary. The battery in any phone is the most vital component since a phone is worthless if it does not have a battery. As for the Samsung Galaxy M31 battery, it has a capacity of 6000mAh and can provide a power backup of up to one day when used moderately.
7 Easy Ways Of How To Take Screenshot In Samsung M31

7 Easy Ways Of How To Take Screenshot
These are the quick steps of how to take screenshot in Samsung M31:
- How to take screenshot in Samsung M31 with power and volume down buttons?
- How to take screenshot in Samsung M31 from quick settings?
- How to take screenshot in Samsung M31 from the power button menu?
- How to take screenshot in Samsung M31 with a third-party app?
- How to take screenshot in Samsung M31 with palm swipe?
- How to take screenshot in Samsung M31 from the Smart select panel?
- How to take screenshot in Samsung M31 using Bixby assistant?
We will be talking about all of these methods in detail. So, go through our entire article!
Method No. 1: How To Take Screenshot In Samsung M31 With Power & Volume Down Buttons?

Power & Volume Down Buttons
This is the most frequent technique for taking a screenshot on Android, and it is compatible with the vast majority of devices (including Samsung Galaxy). Simple as that. Simply open the screen you need to record and simultaneously click the Power and Volume Down keys on your phone.
As a result, you must first identify where they are on your Android smartphone. The two buttons that are stacked on top of each other on the right edge of most Android devices nowadays are the power and volume buttons. Your Android device’s Power and Volume Down keys may be located in a different location depending on who produced it and how well it functions before.
Another frequent configuration is to position the Power button on the right side of the phone and the Volume Down button on the left edge. Another variable is the length of time you spend pressing the two buttons on your Android device to snap a screenshot. On most devices, you must press and hold the buttons for some time until you see a white flash, hear a sound, or see an animation.
In addition, a pop-up window displaying a thumbnail of your picture may appear to confirm that you have successfully recorded the contents of your screen. On our Samsung Galaxy, you must press the two buttons for a short time. At the bottom of the screen, your Samsung Android smartphone shows an animated Smart capture menu, which you may use to take images.
Please keep in mind that if this approach does not work on your smartphone, you may attempt another method such as simultaneously pressing the Power and Home keys to snap a screenshot instead. This button combination is most often used on Samsung Android smartphones that have a physical Home button, therefore it may also work for you in this situation.
In any case, we are certain that you will be able to locate at least one additional method of taking a screenshot on your Android smartphone in the coming chapters since most devices have a variety of choices for doing so.
Method No. 2: How To Take Screenshot In Samsung M31 From Quick Settings?

Quick Settings
Some Android smartphone manufacturers include a screenshot button in the Android Quick Settings menu, which may be found in the Android Quick Settings menu. Swipe down from the top of your screen to get access to the menu.
You may have to go through the list of Quick Settings a second time to get the item you are looking for. On your Android smartphone, look for a button labelled Screenshot or Screen capture – the exact term varies depending on your model.
As soon as you press the button, the Quick Settings menu appears, and your smartphone takes a picture of whatever is left on your screen.
Method No. 3: How To Take Screenshot In Samsung M31 From The Power Button Menu?

The Power Button Menu
Some manufacturers provide a Screenshot option under the Power button menu, which is most likely intended to assist customers who are having difficulty with the first technique. Because there is anything on your screen that you would want to record, you are probably already familiar with how to start your Android smartphone, and you have already determined where the Power button is.
If you press and hold it for a few seconds, a menu should appear on the right side of your screen. Select Screenshot from the limited number of alternatives available. The menu appears once again, and your Android smartphone takes a snapshot of the current screen resolution.
Photographs and screenshots taken on your smartphone are saved in the Photos app, and Samsung also provides the Gallery app on its Android-based smartphones. To locate the Screenshots folder, either to the Photos/Pictures tab or the Library/Albums page on your computer’s desktop.
Method No. 4: How To Take Screenshot In Samsung M31 With A Third-Party App?

Third-Party App
Open the Google Play Store and seek third-party applications that may be used to capture screenshots. Many applications exist for Android that may assist you in taking screenshots, but Screen Master: Screenshot & Longshot, Photo Markup is one of the finest in our view.
Download it now. Install it and run it – we produced this instruction in case you need assistance downloading an app from the Google Play Store. A floating screenshot button that is always accessible is enabled by default, and the option to “shake to capture screenshots” is enabled by default – both excellent choices that some people may like to use to take screenshots on their Android devices.
Method No. 5: How To Take Screenshot In Samsung M31 With Palm Swipe?
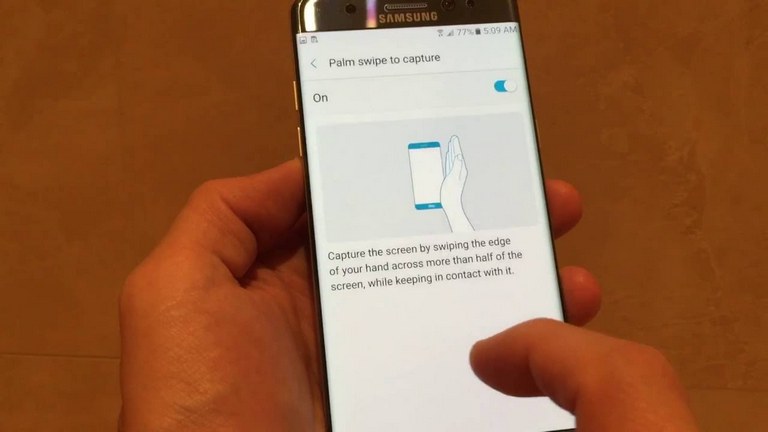
Palm Swipe
In addition to the two techniques we have discussed, Samsung Galaxy smartphones provide a plethora of other choices for taking screenshots on Android. Unfortunately, most of them are not very straightforward, so it is best if you know precisely what you are searching for before you start browsing.
We will start with “Palm swipe to capture,” since it is a fantastic feature that we are baffled as to why it is not available on every Android smartphone. To activate the function, go to Settings, scroll down, and choose Advanced Features from the drop-down menu. To activate the function, just tap on the switch.
Alternatively, you may hit the “Palm swipe to capture” button to bring up an extra screen of information. Take a screenshot by sliding the full side of your hand over the screen, softly brushing it from one edge to the other (either left to right or vice versa) while maintaining your location.
Method No. 6: How To Take Screenshot In Samsung M31 From the Smart Select Panel?

Smart Select Panel
Another method for taking screenshots on Samsung Android handsets is to make use of the Smart choose edge panel on the device. With it, you can easily record as much of the screen as you want without having to go through the process of further editing the photographs.
Smart choose is one of the Edge panels that you have available. To get to it, simply locate the Edge panel handle on your computer’s desktop. The handle has the appearance of a scroll bar and is located someplace towards the edge of your device’s screen (on our Samsung Galaxy, it was placed by default on the upper-right edge).
To slide out the edge panel, tap on it and move your finger inwards from the outside. To discover Smart choose, you may even move your cursor left or right to explore across multiple Edge panels until you find it.
After you have resized the grid so that it fits what you want to record, click Done to complete capturing a screenshot. If you are experiencing trouble taking screenshots on your Android Samsung smartphone using this approach, you may try configuring certain parameters in the Settings app, which can be found in the Apps menu.
Scroll down and choose the “Edge screen” option from the drop-down menu. An animation demonstrating how to access the Edge panels may be seen at the top of the next screen. To make sure that the Edge panels are turned on, press the On button next to the choice.
Edge panels may be activated by pressing them. Following that, you can view the Edge panels that are currently accessible and toggle the option using the switch at the top. If you have completed all of the procedures up to this point and are still unable to discover your Edge panels, choose More from the top-right corner of the screen.
Access the Handle settings, where you may make your Edge panel handle more visible and simple to use by customising it to your liking.
Method No. 7: How To Take Screenshot In Samsung M31 Using Bixby Assistant?

Bixby Assistant
Using Bixby, Samsung’s digital assistant, you may ask it to snap a screenshot for you on an Android Samsung device. Bixby takes a screenshot of your screen right away. We had planned to add a part on Google Assistant in this lesson as well, but sadly, at the time of writing, the functionality is not functioning on any of the devices we tested.
When it comes time to snap the screenshot, the Google Assistant seems to recognise the command, but it becomes stuck while loading. If you insist on taking a screenshot with your voice, Bixby looks to be the more dependable choice at the moment, according to our tests.
Know How To Take Screenshot In Samsung M31 Effectively

how to take screenshot in samsung m31
In addition, Samsung has one more trick up its sleeve: the immediately available Scroll capture button, which allows you to take extended screenshots, collecting all of the information you want in one snapshot.
After taking a screenshot on your Samsung Galaxy mobile, an animated Smart capture menu bar appears at the bottom of your screen, providing you with more choices. If you can scroll on the screen you are now viewing, whether it is a web page or an app menu, an additional option named Scroll capture appears on the left-hand side of the Smart capture menu, which you may choose.
Its logo is comprised of a downward double arrow that bounces up and down. The region beneath your first snap is also screenshotted by your Samsung Galaxy Android device when you tap on it, and the two images are stitched together automatically.
It is useful when the information you want to share or store is too lengthy to fit into a single screenshot and you want to share or save it in batches. You may also keep hitting the Scroll capture button to include each successive screen until it reaches the bottom or you have finished recording everything.